Tag: Maths

Freatures Of A Bar Graph & Tally Chart

This week I learned about the features of a bar graph & tally chart.

A Bar Graph is a diagram in which the numerical values of variables are represented by bars. Tally Chart is what they use to collect data quickly and efficiently.

First I had to talk about what is a bar graph and a tally chart. A tally chart is basically what people use to count or collect data quickly.

Next I had to think about what they use for a bar graph. What they use is, X axis, Y axis, Categories/labels, title, and a scale. Those are the stuff you need to use for a bar graph.

Lastly I had to make a Graph of a Tally chart. For example : I can explain on the top what a bar graph and a tally chart is.

I enjoyed doing this task. I did well at making a tally chart. I need to improve on putting in some design.
Basic Facts Boxes

This week I did Basic Facts Boxes.

First I had to pick a subject befores putting in the answer. For example : There are +, -, x, and divisions. I picked multiplication because I think it’s a great way to start.

Next I had to pick a random to start with or order to start with. I picked an order to start with easy and then random to end with hard.

Lastly I had to press check to see if my answer was correct. I got 100/100 because I have been learning my basic facts while I am away from school.

I enjoyed doing Basic Facts Boxes. I did well at figuring out the answer. I need to improve on doing divisions next.

Basic Facts Boxes

This week I learned about Basic Facts Boxes.

First I had to pick a type of subject or object. They are 3 or 4. They are Pluses, Takeaway, and multiplications. I picked takeaways because I think it will be medium.

Next I had to pick which one I wanted to pick. The options were random, or orders. I picked orders because I wanted to start of easy to hard. It was so easy that I could do it in 1 minute.

Lastly I had to press check to see if I got all of the answers right or wrong. I got it all right and I got 100/100. I am so proud of myself that I got 100/100.

I enjoyed doing Basic Facts Boxes. I did well at choosing a subject or an object. I need to improve on starting off hard.


Basic Facts Boxes

This week I did Basic Facts Boxes.

First I had to pick a subject befores putting in the answer. For example : There are +, -, x, and divisions. I picked takeaways because I think it’s a great way to start.

Next I had to pick a random to start with or order to start with. I picked an order to start with easy and then random to end with hard. ‘

Lastly I had to press check to see if my answer was correct. I got 100/100 because I have been learning my basic facts while I am away from school.

I enjoyed doing Basic Facts Boxes. I did well at figuring out the answer. I need to improve on doing divisions next.

Solve emoji

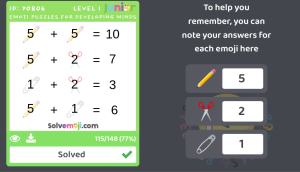
This week I learned about solving emoji.

Solve emoji is a type of maths game you can play.

First I had to pick a problem I wanted to solve. There were lots of different subjects. For example : There are +, -, x, and divisions.

Next I had to figure out the problem and what the emoji is worth of. For example : Pencils are worth about 5.

Lastly I had to think or figure out the answer for it. I worked out the problem by solving the pictures / emojis. The answer was 6.

I enjoyed solving emoji. I did well at figuring out the emojis. I need to improve on doing a harder level.

Marble Maze

How to make a Marble Maze.

A Marble Maze is fun for kids to play with & take it home.

Materials.

  • Cardboard
  • Straws
  • Glue
  • Pen
  • Scissors
  • Ruler
  • Your Maze Marble paper

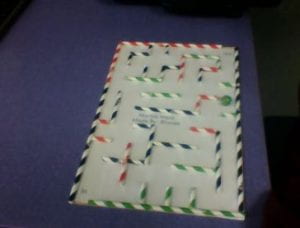
How to Make a Marble Maze :  We have to get a cardboard for everyone to place their Marble Maze Paper onto the cardboard.When we place the paper we have to get a small bottle of glue & glue it onto the lines that are on the paper. When you have done you also have to get the straws and stick it onto the glue that is along the line.  You have to also get long straws to place onto the corner to block the way the marble goes out of it. 

Final step : You have to get a Marble and play with it. Enjoy!

How to tell the time

Time can be used in hour, minutes, and seconds.

To tell the time you have to know the parts of a clock which are the hour hand, hour division, minute division, minute hand, past side, to side, and the face of the clock. If there is another little hand it is called the small hand.

When the hour hand is on the 6 it’s half past. When the minute hand and the hour hand is on the number 12 it means it’s 12 o clock. The long hand is the minute hand and the short hand is the hour hand.

There is a second hand but on some clocks that we see most of them don’t have the second hand on the clock. The little black dots on the clock behind the numbers are called minute marks.

When the hour hand is on 5 and the minute hand is on 12 it is 5 oclock.

Marble Maze

This week I learned about Marble Maze and how to make a Marble Maze.

First I had to draw seven ligh lines horizontal and ten light lines going vertical.

Next I had to figure out a hard way to go out of the marble maze. I had to also write down in & out.

Lastly I had to make the same marble maze on a google draw. Mr Wong showed a easy way to do a marble maze on a google slide. I had to show one of the teacher to see if they can figure out a way to get out of the marble maze.

I enjoyed doing this activites. I did well at drawing the marble maze on the google slide. I need to improve on doing a hard way.